LC1 Dimming Controller: Configuration Guide

SPECIFICATIONS
| Power Supply | Input Voltage Input Current | 15V to 42.4VDC, Max=50VDC 10mA to 20mA DC |
| Dimming Output | Output Voltage Output Current | 0V to 10VDC Up to 10mA DC (source or sink) |
| Operating Environment | Installation Location Operating Temperature | Dry location only 0 to 50°C |
| Dimension | 2.1" (L) x 1.05" (W) x 0.46" (H) |
OVERVIEW
The Alec LC1 is an innovatve, low cost lighting controller. When paired with a compatble dimmable LED luminaire, it instantly turns the luminaire Into a smart LED light that automatically dims or turns OFF the lights when vacancy is detected or when there is sufficient daylight, and thus minimizes energy wastage.
Alec LC1 is certified to work with any certified dimmable LED drivers with UL/CSA Class 2, 0-10V dimming input and Class 2 DC output voltage < 42.4V and < 100VA. The dimming input and LED driver outputs must be electrically isolated from the main power. LC1 draws a small amount of current from the driver's positive LED(+) DC output terminal to power its CPU and built-in sensors. This in turn automatically adjusts the 0-10V dimming signal of the compatible LED driver to control the brightness of the LED light based on algorithm.
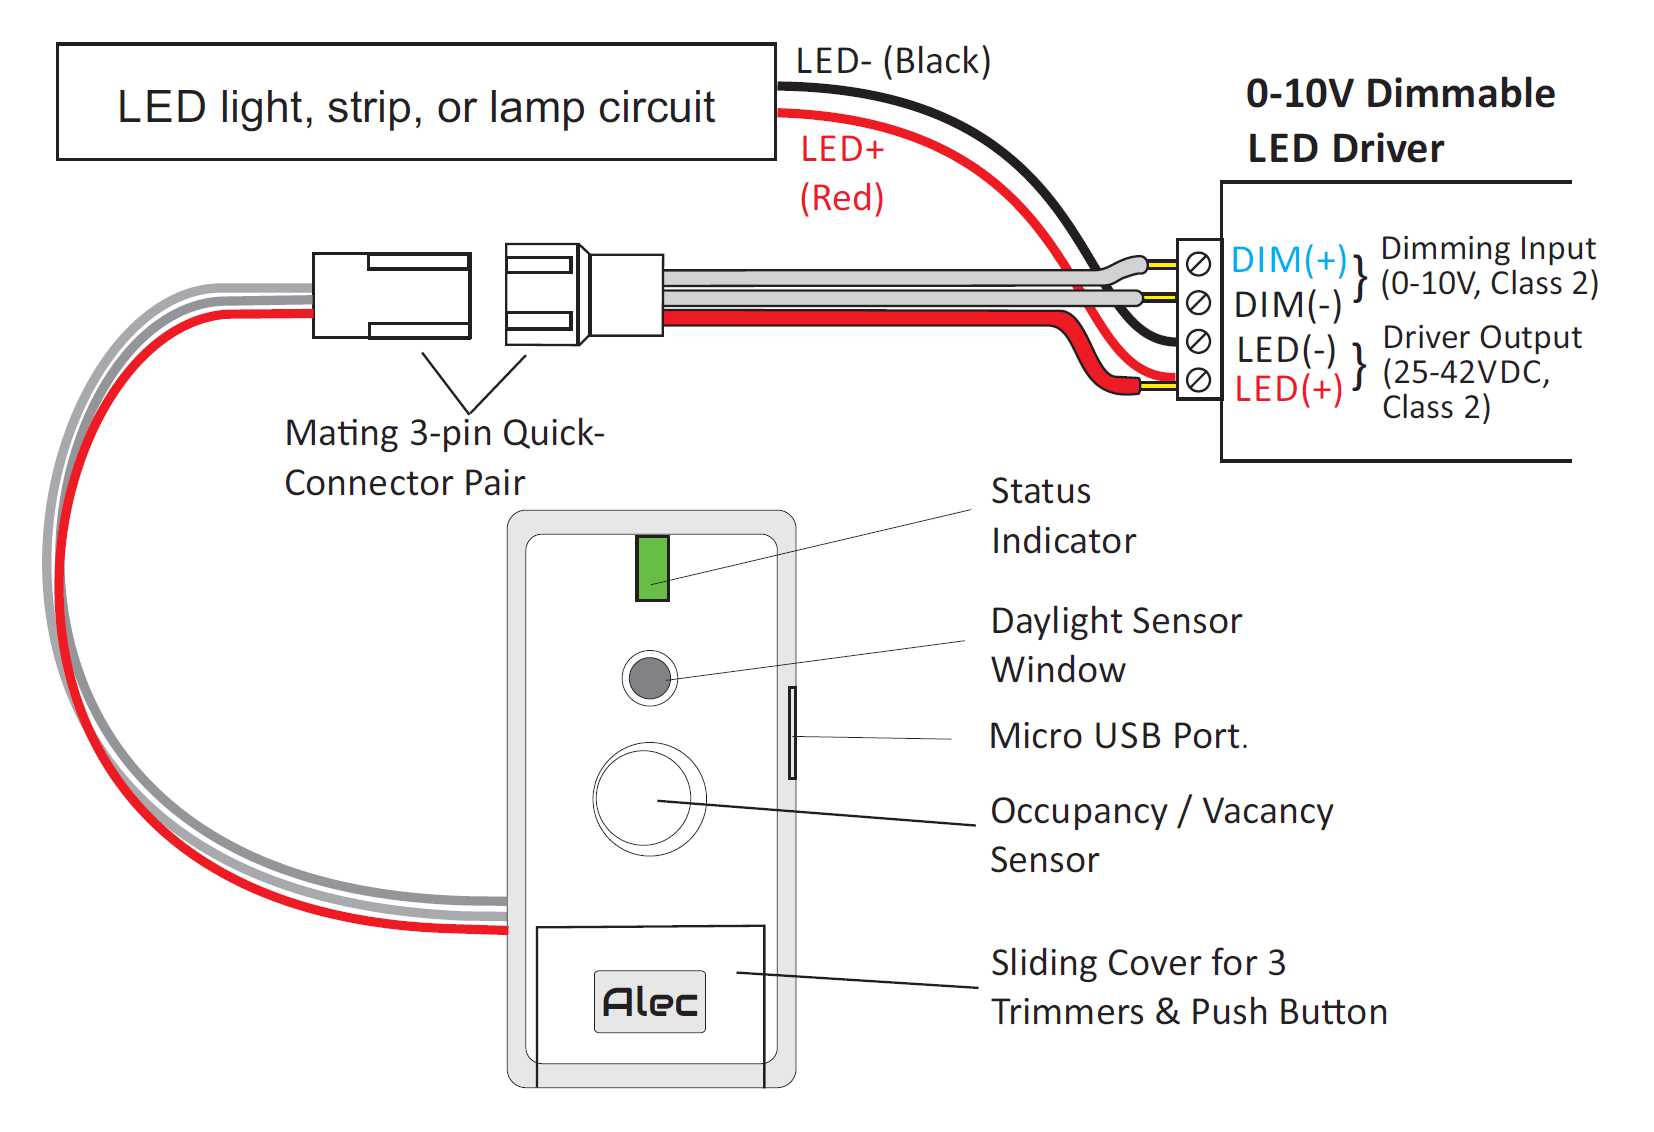
To simplify wiring, LC1 provides a pair of 3p ribbon cables that are each 25cm (10”) long. One cable is attached to the LC1 controller and has a male 3p quick connectors. The second cable has a female 3p quick connector on one end and the other end of the 3p cables are stripped and tinned. The stripped end of the cable is to be connected to the LED driver as described in the steps below (Note: For LC1 SmartLED Conversion Kit this cable is already pre-attached to the LED driver of the Alec RF1 LED Retrofit Kit):
| 1 | Connect the RED wire of the 3p ribbon cable to the LED driver’s LED(+) output (for powering the lighting load). The middle wire to the DIM(-) input and the 3rd wire to the DIM(+) input. |
| 2 | Next, install the LED luminaire onto the ceiling as per its installation instructions. |
| 3 | Install the LC1 controller adjacent to the luminaire, but at a suitable location (preferably above a work
station where the occupancy sensor can easily detect human presence and the light sensor can measure
the area's brightness). The LC1 controller has a permanent magnet on its back cover to enable
simple attachment to the T-bar grid of the suspended ceiling. It may also be adhered to the steel body of the luminaire. Note: To install the LC1 controller on a non-metallic ceiling surface: fasten a small steel plate of suitable size (not included) to the ceiling, then the LC1 can be magnetically attached to the steel plate. |
| 4 | Join the quick connectors of the ribbon cable on LC1 and the ribbon cable that was attached to the LED driver (described in (1))
together to complete the installation. Note: You may extend the length of the cable connection between the LC1 and the LED driver by purchasing the extension cable (part # CABLE-LC1-060) as shown below. Multiple pieces of CABLE-LC1-060 may be connected to further extend the cable for applications where the LC1 controller needs to be installed at further distance away from the luminaire.  |
The Green LED Indicator |
 |
| 1. | Turns ON for 2 sec: whenever occupant is detected. |
| 2. | Blinks rapidly: triggered when any of the 3 trimmers is adjusted for more than 5%, which puts LC1 in trimmer-adjustment mode. Exit automatically 3 seconds after all trimmer adjustment has stopped. |
| 3. | Blinks slowly once a second: Vacancy time-out is DISABLED |
| 4. | After pressing “Daylight Harvesting TACT Switch”:
|
CONFIGURING LC1 CONTROLLER
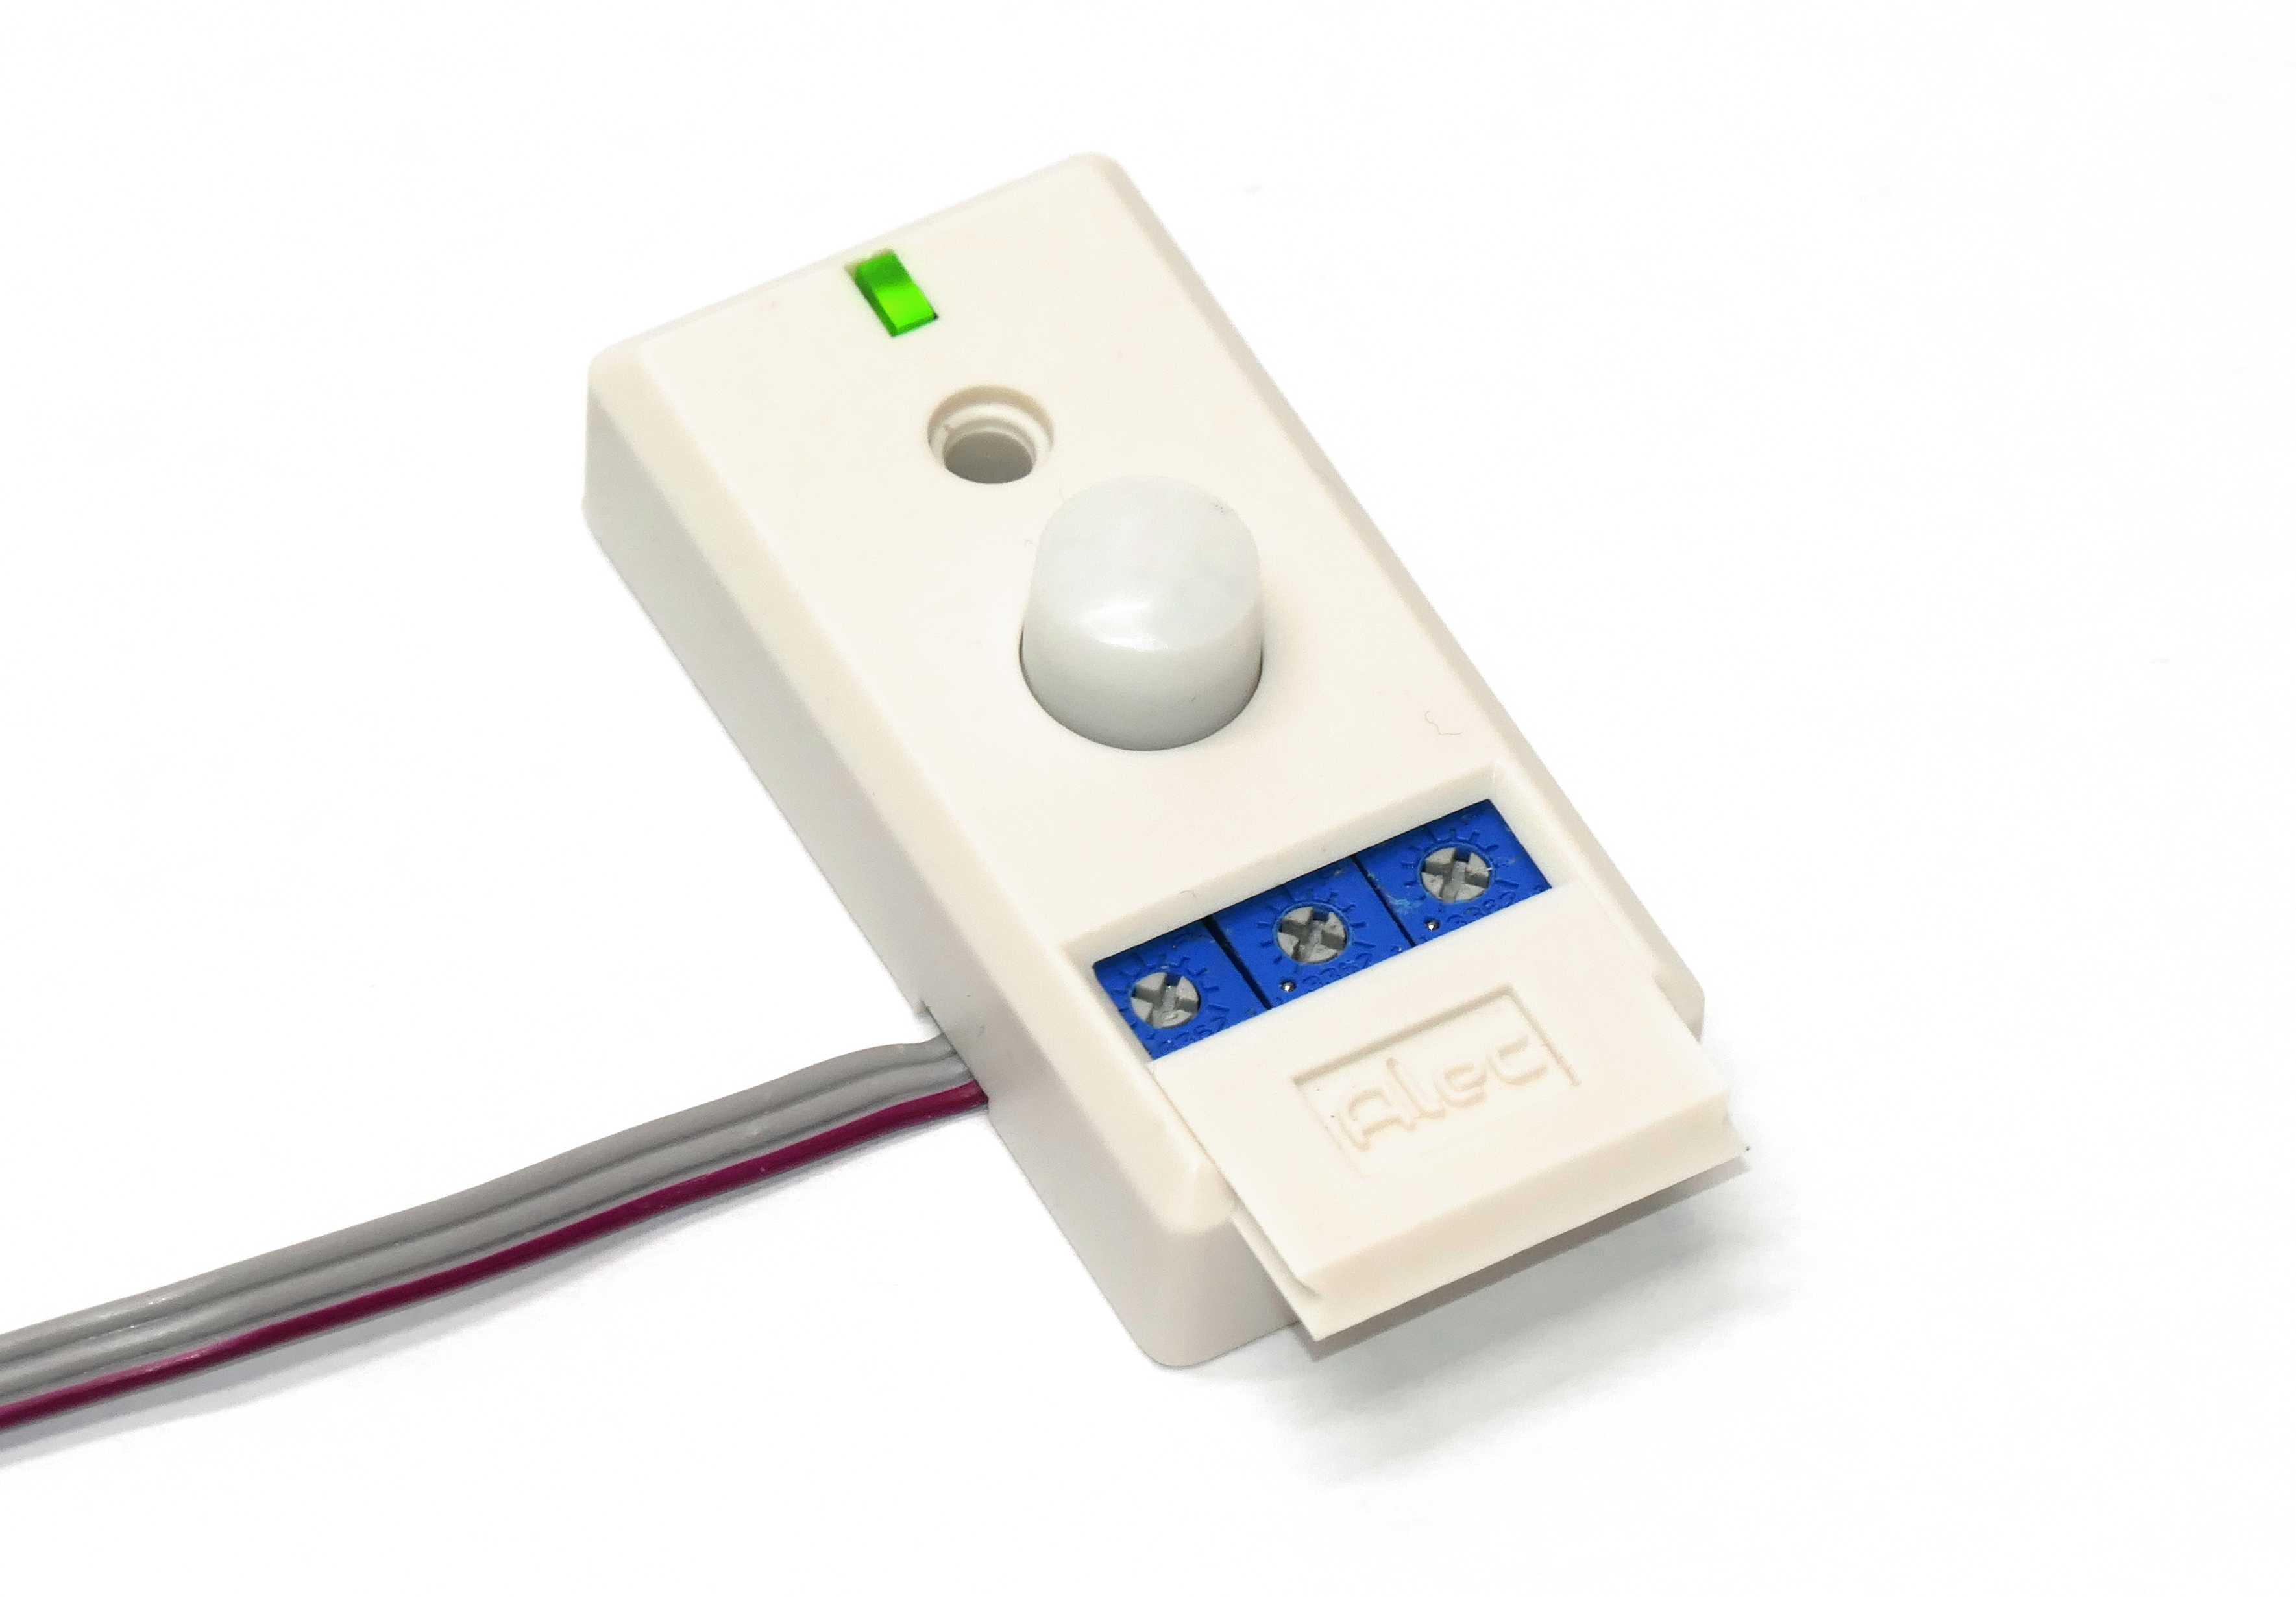
1. Configure using only a screw driver
You can easily configure the LC1 controller using only a screw driver! Simply slide over the trimmer cover and expose the 3 trimmer
potentiometers as shown below:
 |
 |
When you stop adjusting the trimmer for more than 3 seconds the LED indicator will stop blinking.
LC1 now exit the "trimmer adjustment mode" and will record the new settings in its non-volatile memory.
| Note: If turning any of the trimmers does not cause the green LED to start blinking at all, then LC1 trimmers may have been locked out by someone who had previously configured the LC1 using the USB port. You can release LC1 from the trimmer lock-out mode by turning the middle trimmer ("Working Brightness") anti-clockwise to 0 and LC1 will release itself from the trimmer lock-out. You should see the green LED start blinking rapidly when trimmer settings is in effect and you can then set the parameters using the trimmer as per normal. |
Functions of the 3 Trimmers & 1 TACT-Switch
| 1. | Vacancy Time-out:This controls the time period when the space must be vacant (i.e. no occupant is detected) before the light starts to dim down. The time-out is adjustable from 1 to 30 minutes. If you turn anti-clockwise all the way to 0 then both occupancy and vacancy control are disabled. |
| 2. | Working brightness level:Adjust to the most comfortable light level when occupied. When you adjust this trimmer the light that LC1 controls will change brightness as the trimmer is adjusted. This give you instant feedback so that you can adjust the brightness to the preferred "working brightness" level. The allowable range is from 10% to 100% |
| 3. | Vacancy light level:Set to either: i) a low light level, or ii) turn off completelyWhen you adjust this trimmer the light that LC1 controls will change brightness as the trimmer is turned. This gives you instant
feedback so that you can adjust to the preferred brightness that you would like the light to dim to when vacancy time-out has occurred. If you adjust this trimmer anti-clockwise all the way to 0 it means you want LC1 to turn OFF the light after time-out.
Note that LC1 automatically deploy a
"dual stage OFF" feature such that the light will first dim down to a "holding brightness" level (default is 25%). The light will
be maintained at the "holding brightness" level for a "holding period" (default is 120s = 2 minutes) and is only turned OFF
after the "holding period" has expired. When you stop adjustment of this trimmer and after LC1 exited the "trimmer adjustment mode", LC1 will change the brightness level back to the "working brightness" level defined in 2). |
| 4. | Daylight Harvesting Enable/Disable
This tact switch is situated below the 3 trimmers (you may need to slide the cover further down to expose this tact switch).
Pressing it once using the screw driver will disable the daylight harvesting
function and this is indicated by the green LED blinking rapidly for a few seconds. Pressing the TACT switch again will enabled
daylight harvesting again and this is indicated by the green LED slowly Fade ON and then Fade OFF.
|
Typically, these are the only parameters you need to set for LC1 to work in most commercial lighting applications.
When you first install the LC1 to the ceiling and power on for the first time you should adjust at least the "Working Brightness"
trimmer once. Doing so will inform the LC1 to measure and memorize the perceived brightness. Thereafter LC1 will always try
to main the same brightness level by controlling the dimming input to the LED driver.
Consideration for Daylight Harvesting
If you are using daylight harvesting then we suggest adjusting the brightness level at a time of the day when there is adequate daylight that are let into the space. LC1 will memorize the light meter reading at the light level you have set. When there is less daylight LC1 will brighten to compensate for the lower daylight. Likewise if the current daylight is stronger than the set light level then LC1 will dim the light down to reduce output light level and save energy.
2. Configuring via USB (Optional)
Every LC1 has a built-in micro USB port allowing them to be programmed by a computer, an Android tablet or an Android Smartphone. Using the app allows you to enter the 3 parameters (Working Brightness, Vacancy Time-out, Vacancy Dim level) digitally and thus attain more precise control. You can also use the app to change other default parameters such as the "holding brightness" and "holding delay" if you are not satisfied with the factory default values.
This section describes how to use the "Alec Mobile App For Android" to configure the LC1. PC Users
Important Note: |
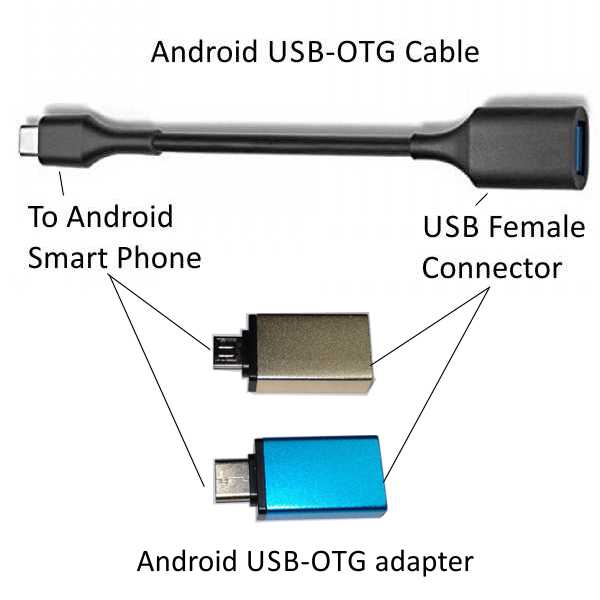
| 1. | Please ensure that your Android phone supports USB OTG (On-The-Go). | ||
| 2 | You will need to purchase a USB-OTG adapter or a USB-OTG cable, and a standard USB-to-Micro-USB cable (See photo below)
from any mobile phone accessory shop or from ALEC SmartLighting.
| ||
| 3 | Search for "Alec Mobile" app at Google store. Download and install the App
| ||
| 4 |
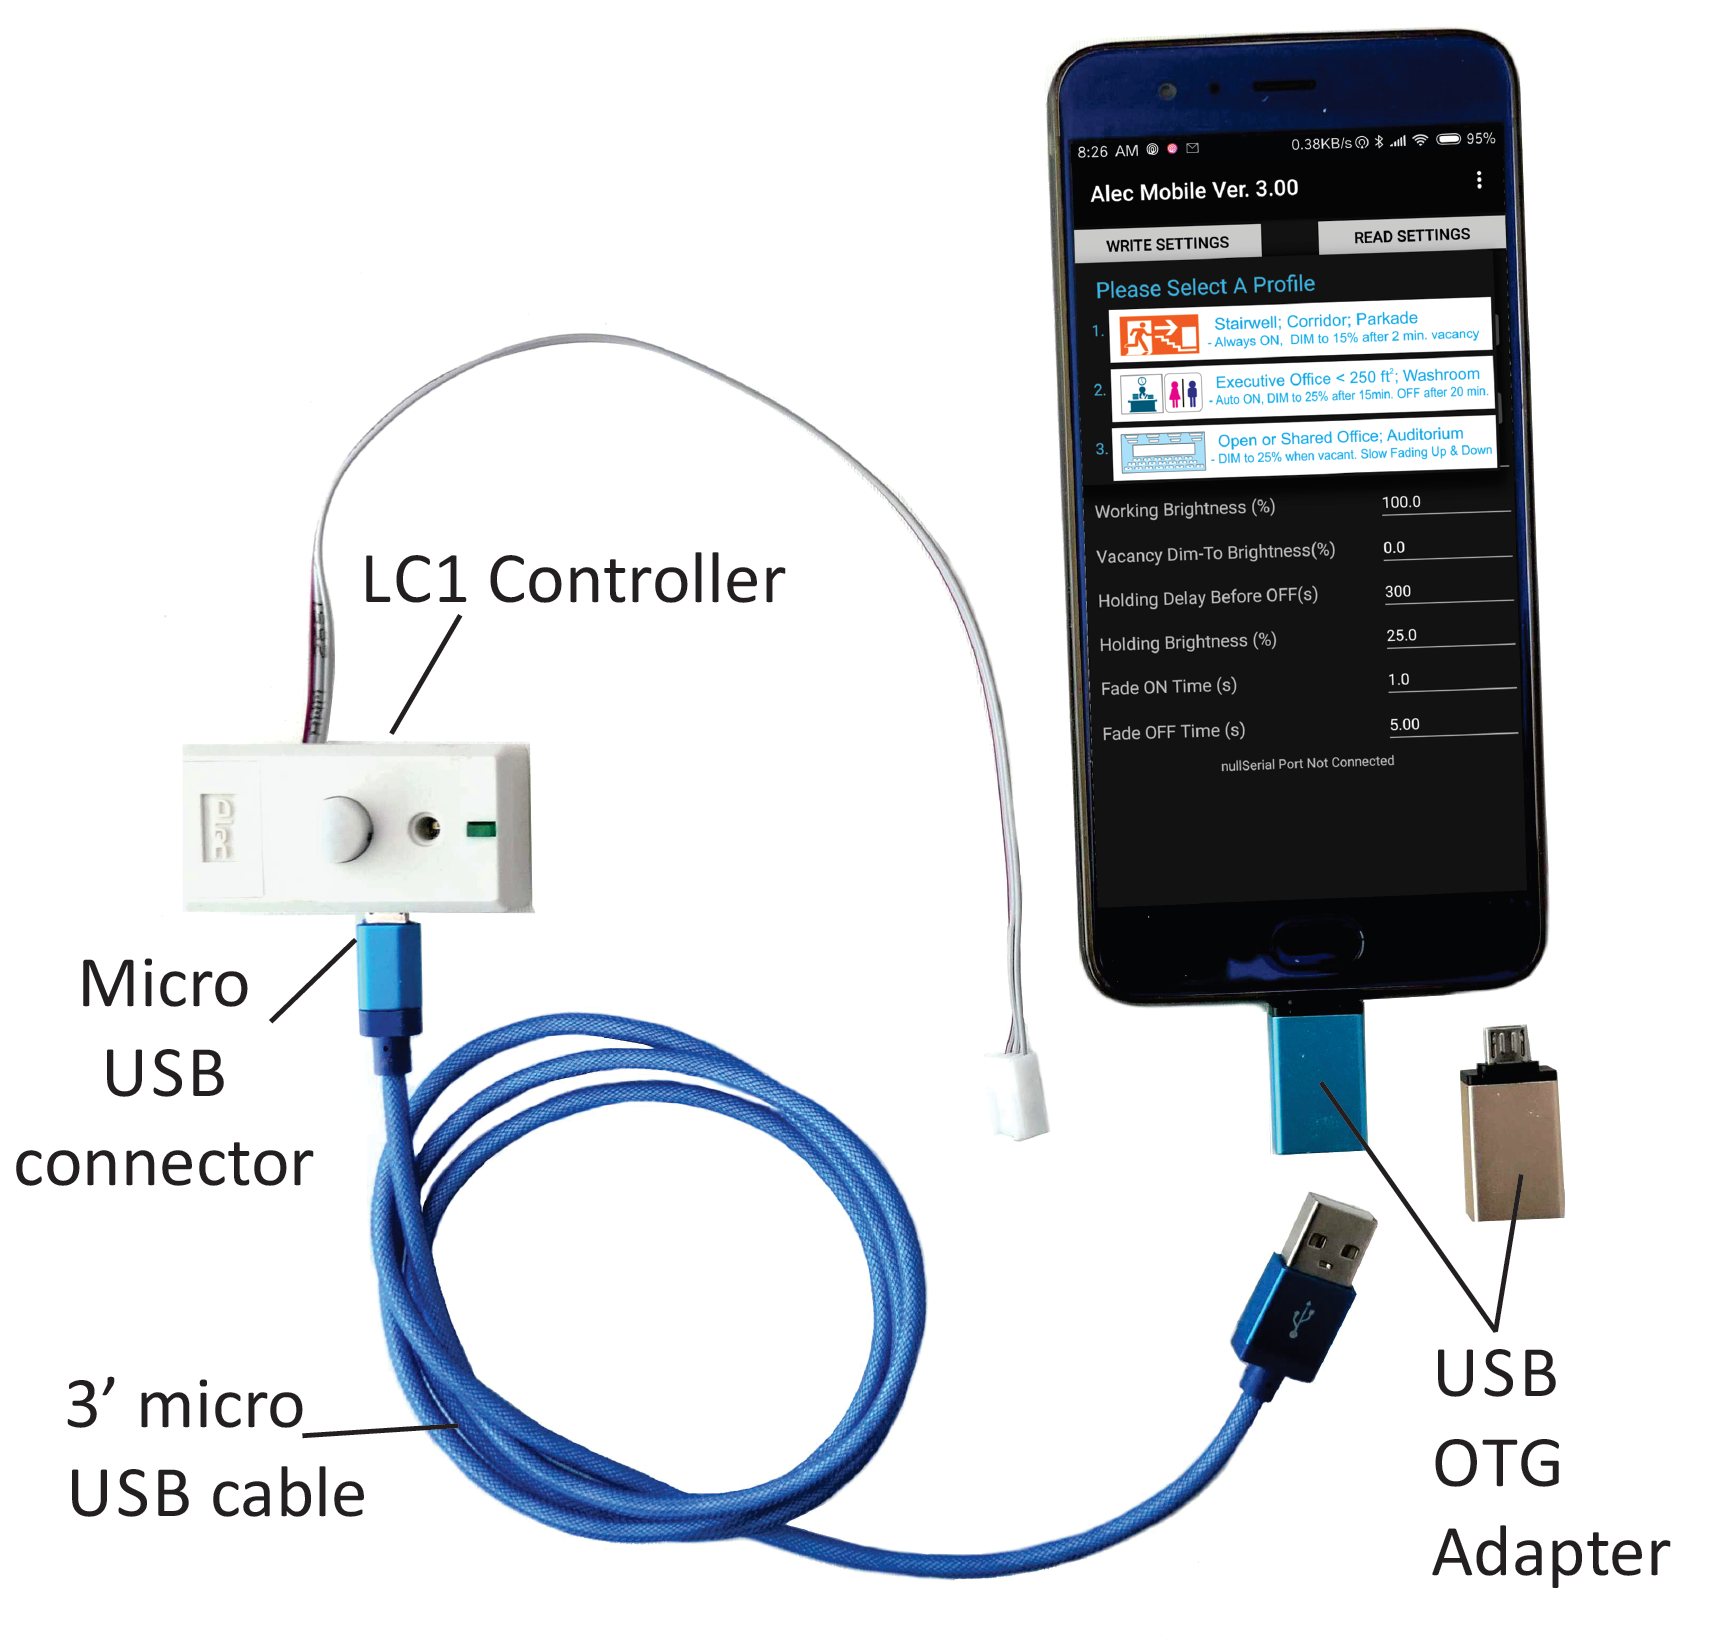 Connect the USB OTG adapter to your android phone and the Micro-USB cable to the LC1 controller. Then, connect the male and female USB connectors on the two parts together to form a complete connection from your Android phone to the LC1 controller, as shown in the picture above. The Alec Mobile App would normally be invoked automatically once the connection is made. |


BASIC CONFIGURATION
|
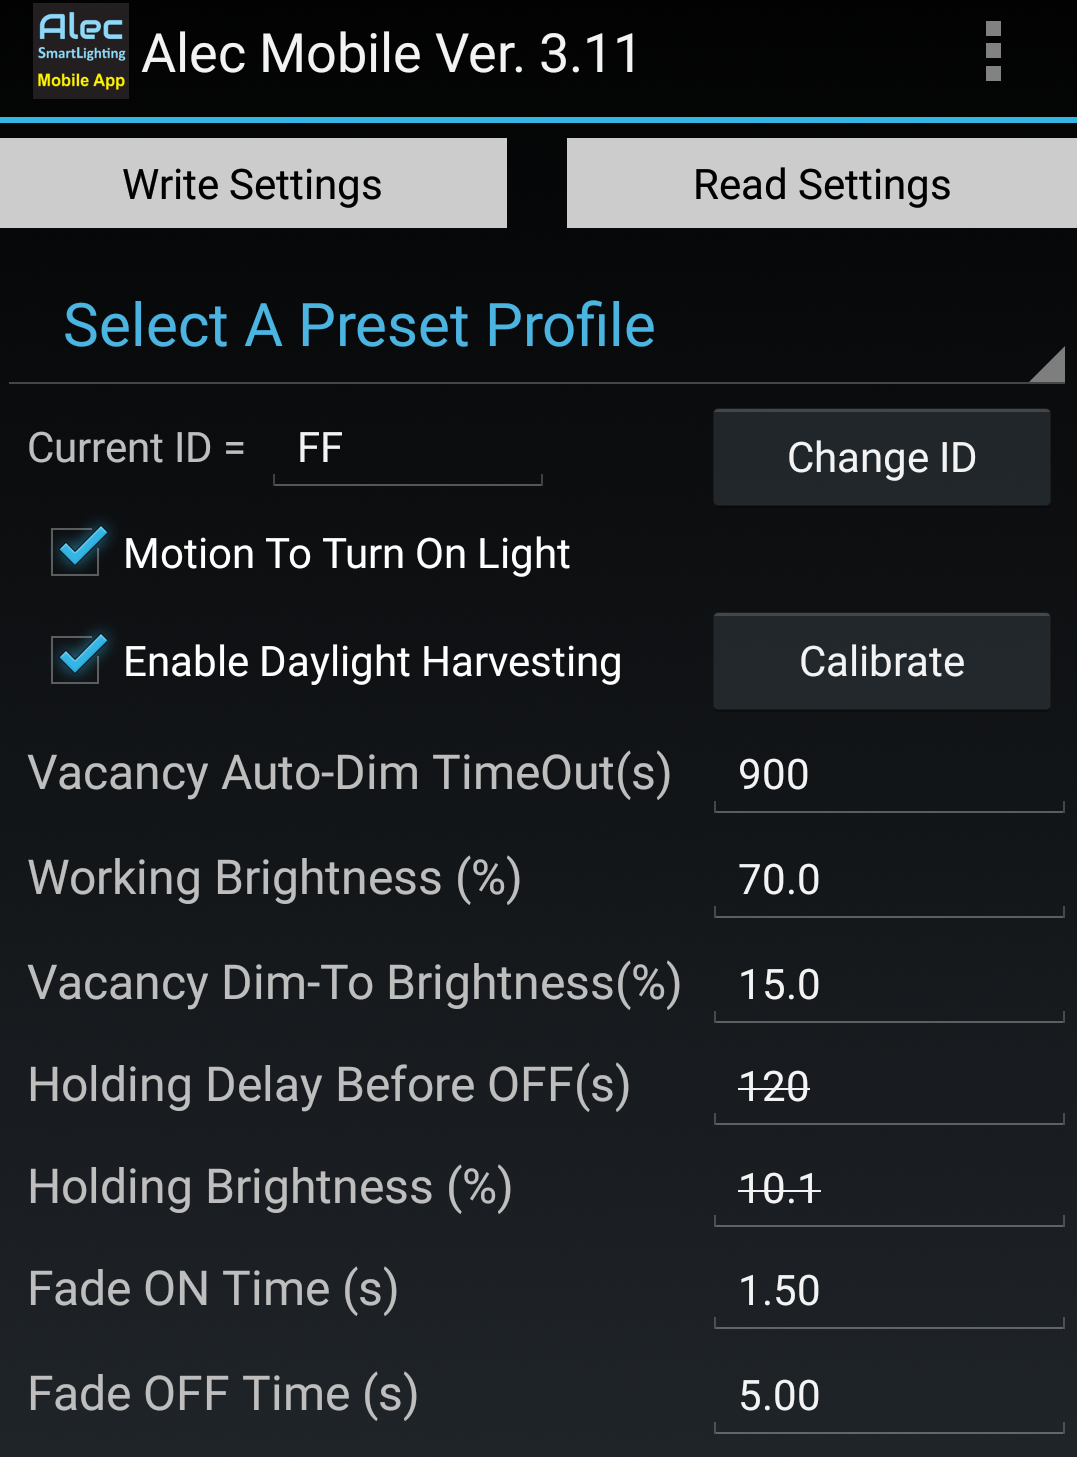
When the Alec Mobile App is launched, the Basic Configuration screen will appear immediately. This screen allows you to precisely enter several parameters that can also be set using the 3 trimmers if the app is not used. In addition, several other parameters can only be set using this app. You can retrieve the current settings by clicking the “READ SETTINGS” button. Doing so also confirms that you have
a proper USB connection between your Android phone and the LC1. After you have made the desired changes to the settings, click the “WRITE SETTINGS” button to write the new
settings to the LC1 controller. Pre-defined ProfilesIn the latest Version 3.x of the ALEC mobile app, the Basic Configuration also provides some pre-defined profiles that allow the user to quickly select the pre-defined settings for several different applications. You can touch the profile selection drop down menu to see the list of pre-defined profiles as shown below: 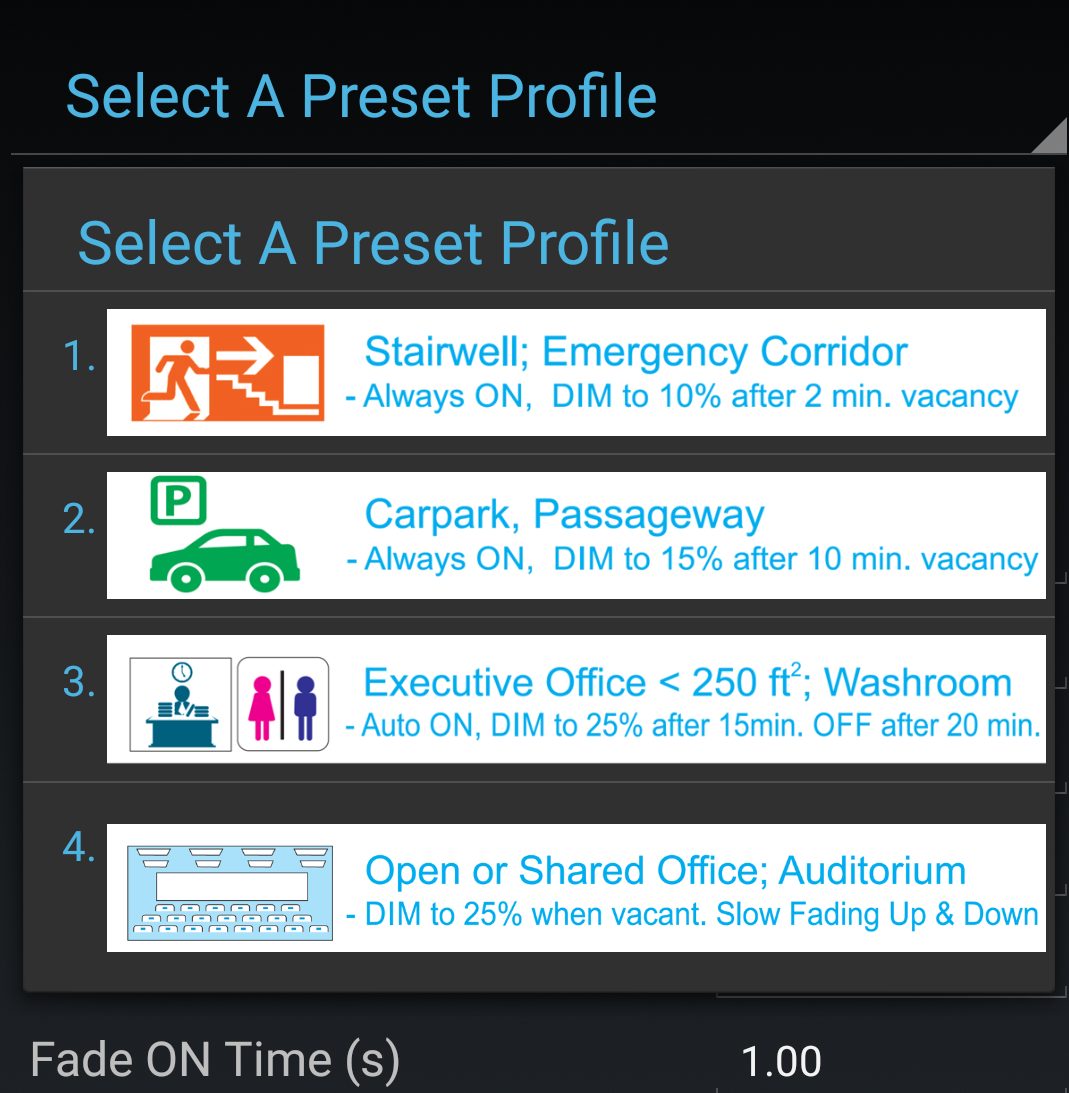 After you have selected a profile it will automatically fill in all the parameters in the Basic Configuration screen. You can still make changes to the pre-filled parameters to suit your application needs. When you are satisfied with the settings then click the "Write Settings" button to transfer the new parameters to the controller. The following describe the function of each parameter: |
| 1. | Current ID – Not important for LC1 since it is not networked. You can leave the default ID as FF. |
| 2. | Motion To Turn ON Light (default is checked). If checked, and if the light is currently in the dimmed or OFF state, it will brighten to the User’s Set Brightness level when an occupant is detected. If unchecked, then the light will not brighten when occupants are detected (Vacancy Auto-Dim will still work, even if this is unchecked. However, the light will not brighten up anymore and you will need to manually turn OFF the light and then turn back ON again for the light to brighten up to the working brightness). |
| 3. | Enable-Daylight Harvesting (default is checked). You can disable Daylight Harvesting completely by unchecking this check box. Note: You can also enable/disable the Daylight Harvesting function using the TACT SWITCH as described in the earlier section. |
| 4. | Vacancy Auto-Dim Time-out (default is 900s = 15 minutes). This determines the period
when the space must be vacant (i.e. no occupant is detected) before LC1 starts to dim-down the light.
If you enter a “0” for this field, it will disable both Occupancy-ON and Vacancy-OFF functions. Note: this will overwrite the settings of the “Vacancy Time-Out” trimmer. |
| 5. | Working Brightness (default is 100%). This sets the working brightness level of the light when it is first turned ON, or when it automatically brightens after detecting occupants. Note: this will overwrite the settings of the “Working Brightness” trimmer. |
| 6. | Vacancy Dim-To Brightness (default is 10%). Usually set between 10% and 25%.
LC1 will maintain the light at this brightness level after the vacancy time-out.
Set this value to 0% if you want the light to be turned OFF completely after vacancy time-out.
(Note: this will overwrite the settings of the “Vacancy Dim-To Brightness” trimmer). Additional note: when LC1 is programmed to turn OFF light after time-out, the light will first dim down to a “holding brightness” level (default is 25%) and stay at the “holding brightness” for a “holding period” (default is 120s), before being turned OFF completely. This is the “Dual Stage Off” feature. |
| 7. | Holding Delay Before OFF (default is 120s = 2 minutes) : If LC1 is configured to turn off the light after vacancy time out, then it uses a “Dual-Stage OFF” technique. Dual-Stage OFF will enable the light to first dim down to a “Holding Brightness” level and stay at that brightness for a “Holding Delay” period. During the “Holding Delay”, if no occupant is detected, the light will then be turned off completely. Anytime during the “Holding Period”, an occupant can cancel the vacancy off with a slight movement. Thus, the occupant will never experience the shock of lights turning off on them suddenly without warning. |
| 8. | Holding Brightness Before OFF (default is 25%) : Holds the light level at this brightness during the Dual-Stage OFF period as described in (4). You can change this value to other preferred brightness. |
| 9. | Fade ON Time (default is 1.5s) : Time it takes for the light to brighten from OFF to full brightness. |
| 10. | Fade OFF Time (default is 5.0s) : Time it takes for the light to dim from full brightness to OFF. |
ADVANCED CONFIGURATION
|
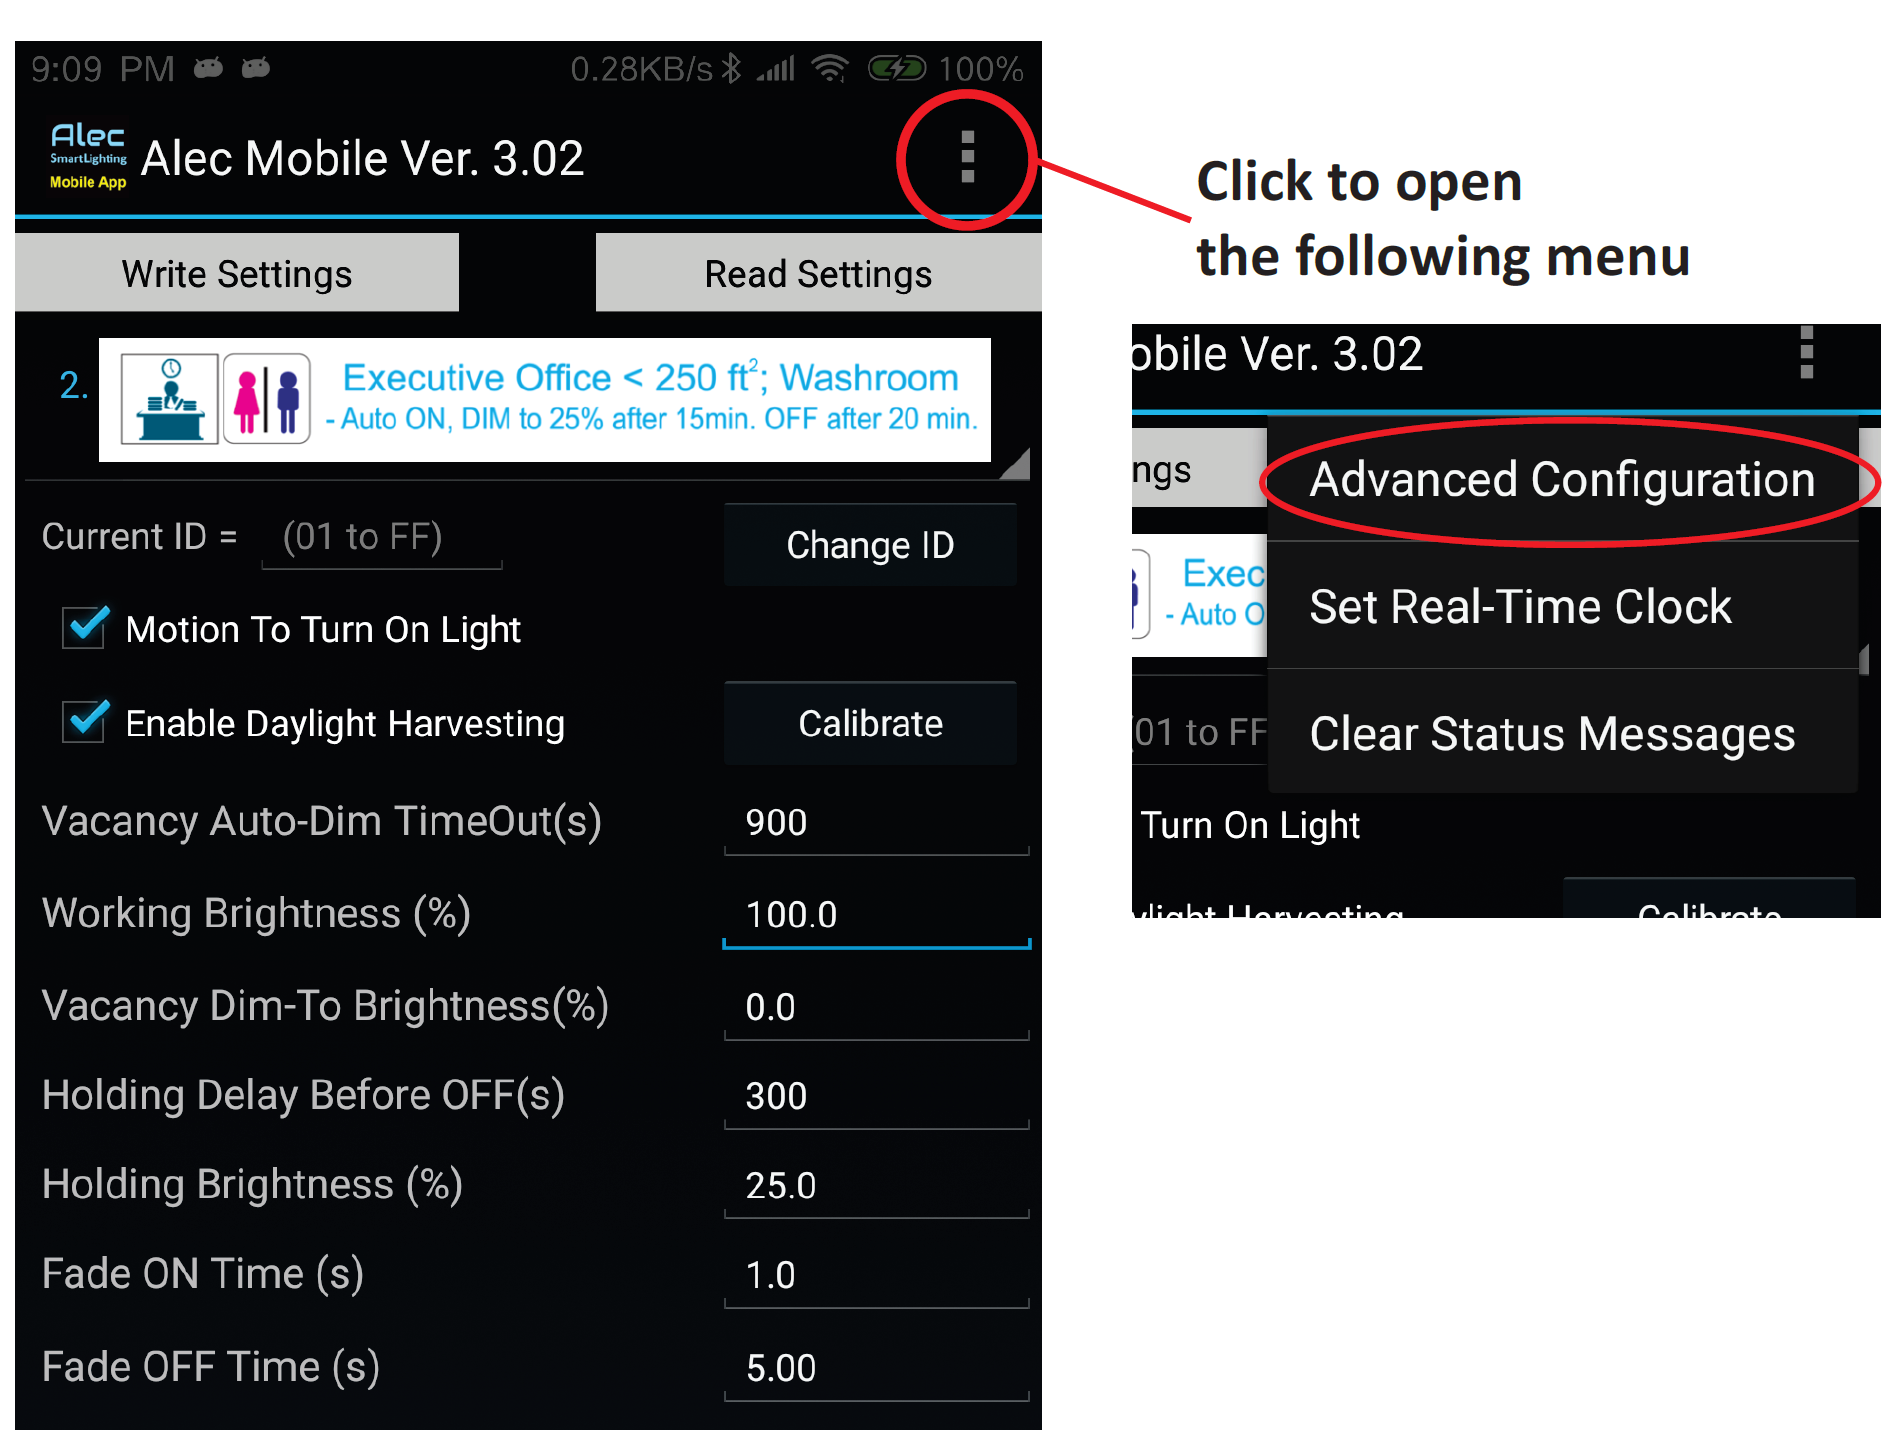
Touch on the 3-dot menu button at the top right hand corner of the Basic Configuration screen and select
“Advanced Configuration”. The “Advanced Configuration screen will appear as shown in the next diagram.
This screen lets you define some other parameters that you probably never need to change unless you have very
special requirements. You can retrieve the current settings by clicking the “READ SETTINGS” button. Doing so also confirms that you have
a proper USB connection between your Android phone and the LC1. After you have made the desired changes to the settings, click the “WRITE SETTINGS” button to write the new
settings to the LC1 controller. The function of each parameter in this "Advanced Configuration" screen is described in detail as follow: |
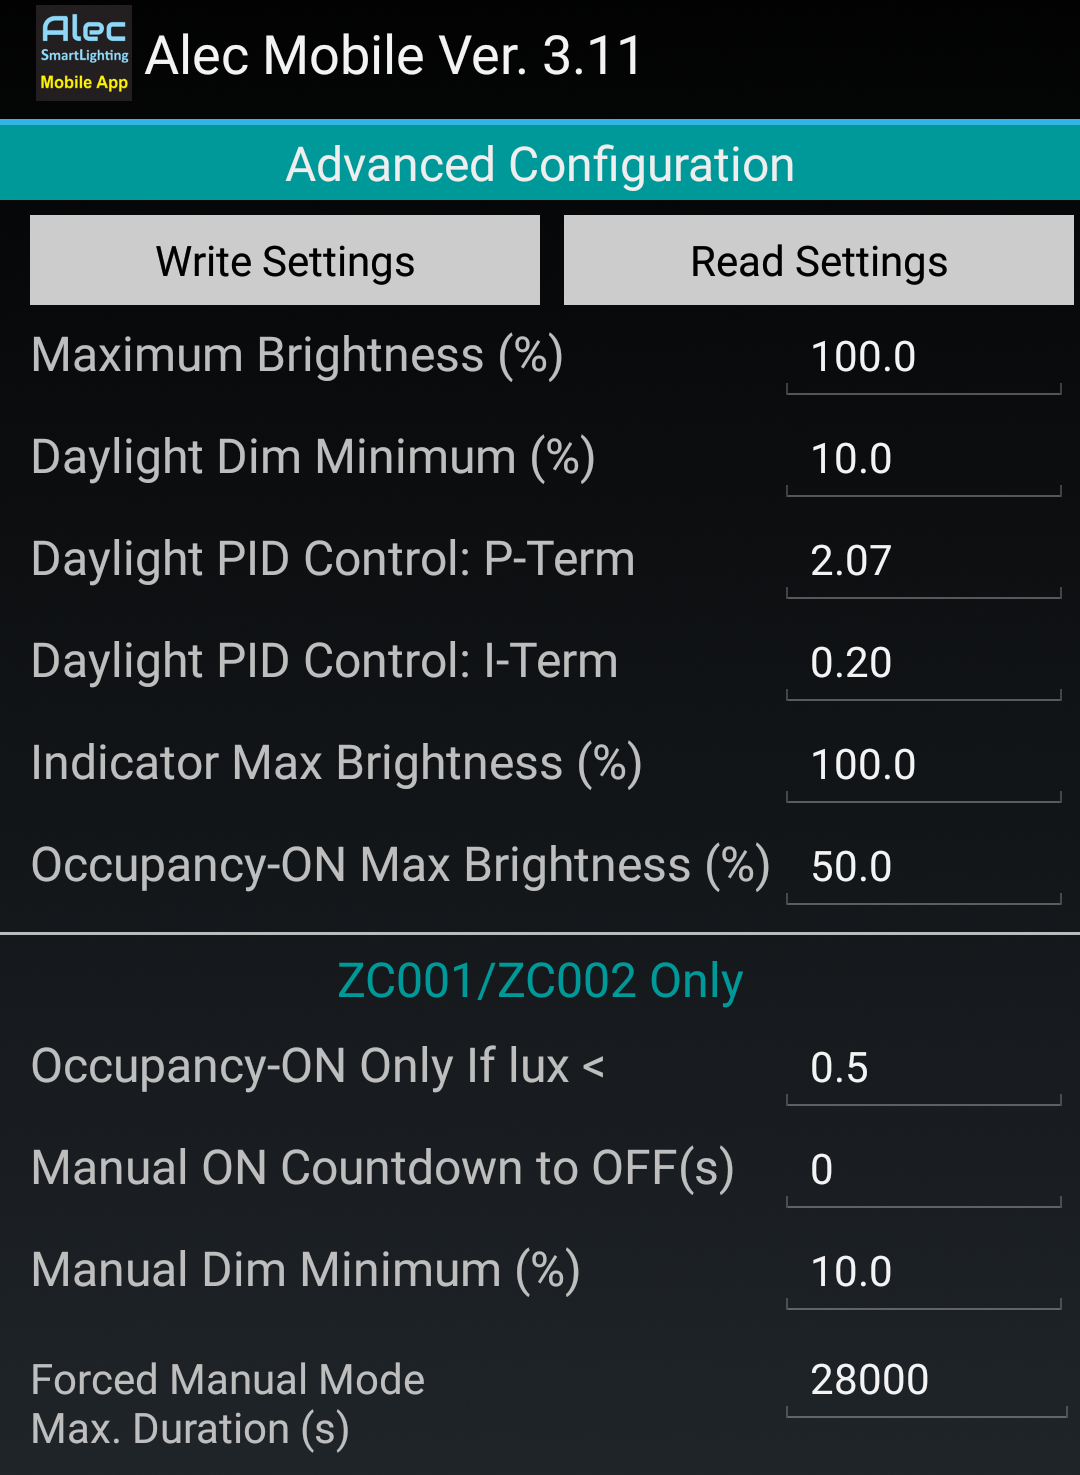
| 1. | Maximum Brightness (default is 100%) : Also known as “High-End Trim”, which is the maximum brightness
that the light will be allowed to reach (both manual and auto brightening). For example: if the luminaire outputs more light than needed for the space (especially when it is new), this is an easy way to prevent over-lighting. |
| 2. | Daylight Dim Minimum (default is 10%) : Specifies the minimum brightness the Daylight Harvesting Control is allowed to dim to. Change this to 0% if you allow the Daylight Harvesting to completely turn OFF the light. |
| 3. | “Daylight PID Control: P-Term” & “Daylight PID Control: I-Term” (default is 2.00 and 0.20 respectively) :
We recommend not changing these two parameters and leaving them at their default values which is suitable for most commercial
lighting applications. Setting higher values for these two control parameters can speed up the daylight harvesting response time, but may also lead to oscillation. You may only need to change these parameters in very special applications. For example: where the light is installed inside a small enclosed space (such as inside a box), thus the changes in the light meter readings are much higher than normal applications, and the default values may lead to oscillation. If you experience oscillation, you can try setting lower values for these two terms to resolve it. |
| 4. | Indicator Max Brightness (%) (default is 100%) : There is a green LED indicator on the LC1 controller that will brighten up when it senses occupant and it also acts as status indicator of the LC1 programming state when turning the trimmers to change parameters. If for any reason you preferably a lower brightness for the indicator you can change it to any value between 0 and 100%. |
| 5. | Occupancy ON Max Brightness (%) (default is 100%) :
If the light is previously turned OFF by LC1, and the occupancy-ON setting is enabled, you can limit the maximum
brightness that light will be automatically brightened to with this setting. However, if you want the light to always brighten
to the last-set working brightness then assign this value to 100%. For example, if the working brightness
is 80% and "Occupancy ON Max Brightness" is set to 50%, then the light will only brighten up to 50% when it is
turned ON by the sensor. To allow the light to brighten to the full working brightness you will need to manually turn OFF
the light switch and then ON again and LC1 will then brighten the light to the full working brightness. Note: ASHRAE 90.1-2010 stipulates that for enclosed space that is automatically turned ON by occupancy sensor the light may
not be allowed to brighten to > 50% unless with user manual intervention. Since most LC1 installation
in enclosed space would likely have a light switch to control the fixture and hence technically the lights are not
fully auto-ON only, we are of the opinion that it should not be subject to the 50% limit rule. However, if your building
inspector disagrees with this inteprettation you can still satisfy his demand in one of the two ways: |
| 6. | ZC001/ZC002 Only - NOT USE BY LC1 Note: Since the Alec mobile app is shared with other advanced Alec lighting controllers ZC001/ZC002, there are several settings that are only meaningful to these other controller models and LC1 user may ignore them. |